


How to Set Up a Firewall Server on FreeBSD 14.2
This article is a translation of the following my article:
Original: ファイアウォールサーバーを自宅で作成する(FreeBSD14.2)
* Translated automatically by Google.
* Please note that some links or referenced content in this article may be in Japanese.
* Comments in the code are basically in Japanese.
by bokumin
How to Set Up a Firewall Server on FreeBSD 14.2
Introduction
I have several servers at home (including this web server). When I was feeling that just functioning as a simple web server was not enough, I received a switching hub. I could have used it as is, but I thought it would be interesting to add even more security by creating a firewall server, so I created one.
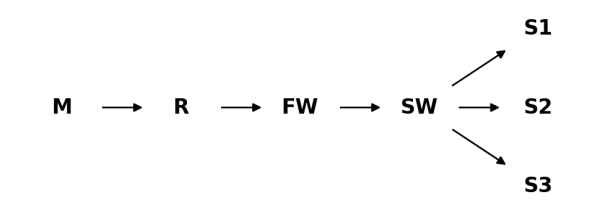
The network diagram is expected to look something like this. It would have been possible to put a FW between the modem and router, but this time I added it to the existing network configuration.
There are various options for firewalls, but this time I decided to use FreeBSD’s PF (Packet Filter). I considered other firewall-specific distributions, but most of them assumed operation with a WebUI, and I felt that they didn’t really take into account terminal operations via SSH connections, which is my preference.
The combination of FreeBSD and PF was ideal for me, as I usually prefer operating in a terminal and was looking for an environment where I could naturally change settings and check logs on the command line. Being able to manage using text-based configuration files has the advantage of being compatible with version control systems and making it easy to track configuration changes.
Initial settings
This time, I burned the ISO file to a USB from the FreeBSD official website and installed it.
https://www.freebsd.org/where
In the installer, I selected: Due to its purpose as a firewall server, it was configured with a minimum configuration.
Keymap: Japanese 106
Hostname:
Components: base-system, kernel, ports
Partition: Auto (ZFS)
Other settings can be changed later as appropriate.
After installation is complete, enter the following command.
pkg update && pkg upgrade
Run ifconfig and check if the interface is recognized correctly.
$ ifconfig
rl0: flags=1008843<UP,BROADCAST,RUNNING,SIMPLEX,MULTICAST,LOWER_UP> metric 0 mtu 1500
        options=2008<VLAN_MTU,WOL_MAGIC>
        ether 00:a0:b0:a5:c4:11
        inet 192.168.2.125 netmask 0xffffff00 broadcast 192.168.2.255
        media: Ethernet autoselect (100baseTX <full-duplex>)
        status: active
        nd6 options=29<PERFORMNUD,IFDISABLED,AUTO_LINKLOCAL>
re0: flags=1008843<UP,BROADCAST,RUNNING,SIMPLEX,MULTICAST,LOWER_UP> metric 0 mtu 1500
        options=8209b<RXCSUM,TXCSUM,VLAN_MTU,VLAN_HWTAGGING,VLAN_HWCSUM,WOL_MAGIC,LINKSTATE>
        ether 40:8d:5c:46:e7:2d
        media: Ethernet autoselect (1000baseT <full-duplex>)
        status: active
        nd6 options=29<PERFORMNUD,IFDISABLED,AUTO_LINKLOCAL>
lo0: flags=1008049<UP,LOOPBACK,RUNNING,MULTICAST,LOWER_UP> metric 0 mtu 16384
        options=680003<RXCSUM,TXCSUM,LINKSTATE,RXCSUM_IPV6,TXCSUM_IPV6>
        inet 127.0.0.1 netmask 0xff000000
        inet6 ::1 prefixlen 128
        inet6 fe80::1%lo0 prefixlen 64 scopeid 0x3
        groups: lo
        nd6 options=21<PERFORMNUD,AUTO_LINKLOCAL>
rl0: Outer (Internet side) interface. IP is automatically assigned by DHCPre0: Inner (LAN side) interface. IP address has not been set yetlo0: Loopback interface (for system internal communication)
Now that both networks are visible, we will next configure the basic network settings for the firewall server.
Basic settings
Let’s configure /etc/rc.conf.
*This time we also fixed the IP address on the router side, but you may need to make settings on the router side, so if you want to do this, please read the instructions for the device you are using before proceeding.
hostname="hogehoge"
keymap="jp.kbd"
ifconfig_re0="inet 192.168.3.1 netmask 255.255.255.0"    # 内向き
ifconfig_rl0="inet 192.168.2.53 netmask 255.255.255.0"   # 外向き # ルータ
defaultrouter="192.168.2.1" # ルータ
gateway_enable="YES"
pf_enable="YES"
pflog_enable="YES"
dhcpd_enable="YES" # DHCP 必要であれば
dhcpd_ifaces="re0" # 同上
Next, create /etc/pf.conf. First, let’s create a basic PF configuration that is thought to work without problems. Ports are opened only to the minimum necessary for SSH.
We recommend adding block all as it denies everything by default.
ext_if="rl0"
int_if="re0"
trusted_net="192.168.3.0/24"


set block-policy drop
set skip on lo0

block all

nat on $ext_if from $trusted_net to any -> ($ext_if)

pass in on $int_if all
pass out on $int_if all

# 外部ネットワークのルール
pass out on $ext_if all
pass in on $ext_if inet proto tcp to $ext_if port 22
pass in on $ext_if inet proto icmp all
After that, we will check if PF is working properly
pfctl -nf /etc/pf.conf
service pf start


pfctl -f /etc/pf.conf
Configure DHCP server (if necessary)
Although this is an article about FW servers, it is for those who also want to add DHCP functionality. If dhcp is not selected during OS installation, install it using the following command
pkg install -y isc-dhcp44-server
Let’s configure the DHCP server. Let’s create /usr/local/etc/dhcpd.conf.
General devices are numbered 100 to 200, and servers are numbered 2 to 99.
cat /usr/local/etc/dhcpd.conf
subnet 192.168.3.0 netmask 255.255.255.0 {
# DHCPは100~200
  range 192.168.3.100 192.168.3.200;
  option routers 192.168.3.1;
  option domain-name-servers 8.8.8.8, 8.8.4.4;
  default-lease-time 600;
  max-lease-time 7200;
}

# 固定IPを割り振りたい場合
# web-serverの場合
host web-server {
  hardware ethernet XX:XX:XX:XX:XX:XX;  # デバイスのMACアドレス
  fixed-address 192.168.3.10;           # 割り当てたい固定IP
}
The lease time is set to be short (default 10 minutes, maximum 2 hours), but if you are not making multiple connections, I think there is no problem with longer lease times.
There are various ways to check the MAC address of a device, but in FreeBSD, you can use the arp command to check the MAC address of a list of communicating devices.
$ arp -a
web-server (192.168.3.10) at 00:11:22:33:44:55 on re0 expires in 1200 seconds
Actually starting the DHCP server
service isc-dhcpd start
Add settings to PF
Let’s flesh out the basic PF settings mentioned earlier.
Configures port forwarding, rate limits, ICMP limits, etc.
With port forwarding, ports 80 and 443 are routed to the web server, and number 22 is routed through the firewall. If you want to log in to the web server using SSH, you can log in using the inward IP address or use the FW as a stepping stone.
Rate limiting is a DoS countermeasure for web servers. We recommend changing the rate limit according to your server specifications.
ext_if="rl0"
int_if="re0"
trusted_net="192.168.3.0/24"
web_server="192.168.3.10" # Webサーバ
firewall_host="192.168.3.1" # FWサーバ自身

table <ratelimit> persist

set block-policy drop
set skip on lo0

rdr on $ext_if proto tcp from any to ($ext_if) port 22 -> $firewall_host
rdr on $ext_if proto tcp from any to ($ext_if) port {80,443} -> $web_server
nat on $ext_if from $trusted_net to any -> ($ext_if)

block all

block in quick from <ratelimit>

pass in on $int_if from $trusted_net to any
pass out on $int_if to $trusted_net

pass out on $ext_if from ($ext_if) to any keep state

pass in on $ext_if proto tcp from any to $firewall_host port 22 keep state
pass in on $ext_if proto tcp from any to $web_server port {80,443} \
    flags S/SA keep state \
    (max-src-conn 100, max-src-conn-rate 15/5, \
     overload <ratelimit> flush global)

pass in on $ext_if proto icmp from any to any icmp-type echoreq keep state
pass out on $ext_if proto icmp from any to any keep state
Let’s add some more settings. 複数ネットワークセグメント間通信, 静的IPブロック on the table, cooperation with fail2ban, etc. We also added controls such as DHCP, but I think it is enough for only those who need it.
ext_if="rl0"
int_if="re0"
trusted_net="192.168.3.0/24"
other_net="192.168.2.0/24" # ルータ側
web_server="192.168.3.10" # Webサーバ
firewall_host="192.168.3.1" # FWサーバ自身

table <ratelimit> persist
# blocklistとfail2banテーブルの作成
table <blocklist> persist file "/etc/pf.blocklist"
table <fail2ban> persist

# グローバル設定
set block-policy drop
set skip on lo0

rdr on $ext_if proto tcp from any to ($ext_if) port 22 -> $firewall_host
rdr on $ext_if proto tcp from any to ($ext_if) port {80,443} -> $web_server
nat on $ext_if from $trusted_net to any -> ($ext_if)

block all

block in quick from <ratelimit>
block in quick from <blocklist>
block in quick from <fail2ban>

pass quick on lo0 all

pass in on $int_if from $trusted_net to any
pass out on $int_if to $trusted_net
# DHCPブロードキャスト許可
pass in quick on $int_if proto udp from any to {255.255.255.255, 192.168.3.255}

pass out on $ext_if from ($ext_if) to any keep state

pass in on $ext_if inet proto tcp from any to $firewall_host port 22 keep state
pass in on $ext_if inet proto tcp from any to $web_server port {80,443} \
    flags S/SA keep state \
    (max-src-conn 100, max-src-conn-rate 15/5, \
     overload <ratelimit> flush global)

pass in on $ext_if inet proto icmp from any to any icmp-type {echoreq, unreach} keep state
pass out on $ext_if inet proto icmp from any to any keep state

# 192.168.3.0/24 <-> 192.168.2.0/24
pass from $trusted_net to $other_net
pass from $other_net to $trusted_net
blocklist: List of IP addresses that you want to permanently block. Loading from external files
fail2ban: Automatically blocks IPs that cause unauthorized access in conjunction with fail2ban (requires installation of fail2ban
This is a function to block or allow IP addresses in a specific file, so you must create it yourself. The following article introduces a feature that blocks SSH access from outside the Japanese IP range. Please refer to it.
Adding an IP address to the table can be done using the following command.
pfctl -t blocklist -T add 192.168.1.100
Alternatively, you can add it directly to /etc/pf.blocklist etc.
cat /etc/pf.blocklist
192.168.1.100
192.168.1.101
Conclusion
By using FreeBSD’s PF, you can build a secure network environment with relatively simple settings. If you are familiar with Unix, I think you can set it up fairly easily.
We recommend starting with the basic settings and building by adding features step by step. Rather than making complicated settings all at once, it is easier to understand the meaning of each rule and identify where the problem is by checking the operation and fleshing it out little by little.
The settings introduced this time started with a simple configuration, and gradually added functions such as exposing the web server, adding rate limits, and finally blocking lists and fail2ban integration. In PF, rules are evaluated in order from top to bottom, and the last matching rule is applied (unless the quick keyword is used). Therefore, be careful with the order of rules. We recommend that you create rules that suit your environment by referring to the FreeBSD official handbook and the OpenBSD PF document.
If you like CLI operations, please try creating a firewall server with FreeBSD.
Referenced site: https://docs.freebsd.org/en/books/handbook/firewalls/
End