


Try FreeBSD on a legacy 32bit laptop (Asus EeePC 1001px)
This article is a translation of the following my article:
Original: レガシー32bitノートPCでFreeBSDを試す(Asus EeePC 1001px)
* Translated automatically by Google.
* Please note that some links or referenced content in this article may be in Japanese.
* Comments in the code are basically in Japanese.
by bokumin
Installing FreeBSD on an old laptop (Asus EeePC 1001px)
Introduction
I found an Asus EeePC 1001x that had not been used and was covered with dust.
EeePC 1001x is a notebook computer that was released in 2011, about 15 years ago. It was written in the article at the time that the low price was attractive. Let’s take a look at the specifications.
| Processor | Intel Atom N450 1.66GHz (1 core HT compatible) |
| Memory | DDR2-667 1GB (up to 2GB can be recognized) |
| Storage | 256GB HDD |
| OS | Windows XP Home Edition |
| Network | LAN terminal x 1 Wifi (802.11 b/g) |
| Other | Equipped with Bluetooth, web camera |
It looks like this. It looks like an electronic dictionary.

The size is approximately 12 inches tablet size. This is what it looks like when compared to an SSD.
*I had pasted stickers on it in the past, so it left a mark.

When I opened it to check the memory slot, the largest 2GB was already in it.
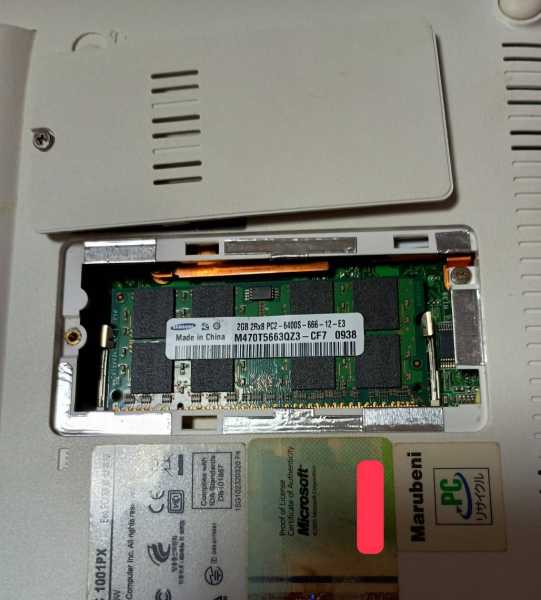
The Atom N450 processor, which is the CPU of this PC, supports only 32bit. I thought about using Puppy or Debian, but this time I would like to install FreeBSD, which is considered to be lightweight and highly stable.
Installing and starting FreeBSD
Download the 32bit version from freebsd.org and burn FreeBSD to a memory stick. It can be downloaded from the URL below.
https://download.freebsd.org/releases/i386/i386/ISO-IMAGES/14.3/
You can create an installation disk using Balena Etcher for Windows or the dd command for Linux. Once burned, plug it into your PC and start it up → select USB from the boot menu.
As for the settings at the time of installation, there is basically no problem with this work as long as you have configured the keyboard input settings. In the worst case scenario, you can change the settings later, so I think it’s okay.
Connecting to the network
After starting up, I checked with the ifconfig command and found that the Wifi module was not recognized.
When I checked dmesg, it seemed that the Wifi module was recognized with the name ath0, so I added it to the ifconfig command.
*The following steps are performed as root user
ifconfig wlan0 create wlandev ath0
Add it to rc.conf so that it will be automatically added to ifconfig at startup from now on.
vi /etc/rc.conf

wlans_ath0="wlan0"
ifconfig_wlan0="WPA DHCP"
Next, check if the wifi router looks normal.
As I wrote in the specifications, this notebook PC is IEEE 802.1b/g, so it does not support 5GHz. Please note that you can only see 2.4GHz channels.
sudo ifconfig wlan0 scan
We will configure Wifi settings with wpa_supplicant. Specify the Wifi ssid and password as below.
vi /etc/wpa_supplicant.conf

network={
    ssid="hogehoge"
    psk="hogehoge"
}
If you want to set multiple settings, add them to wpa_supplicant in the same way. Basically it is read from top to bottom, but you can change the priority by specifying priority.
network={
    ssid="hogehoge"
    psk="hogehoge"
}

network={
    ssid="hogehoge2"
    psk="hogehoge2"
}

# パスワードなしの場合
network={
    ssid="open-hogehoge"
    key_mgmt=NONE
    priority=1 # 接続優先度 数字が大きいほど優先度高
}
Next, we will connect using wpa_supplicant.
ifconfig wlan0 up
wpa_supplicant -i wlan0 -c /etc/wpa_supplicant.conf

# 接続確認
ping 8.8.8.8
PING 8.8.8.8 (8.8.8.8): 56 data bytes
64 bytes from 8.8.8.8: icmp_seq=0 ttl=117 time=9.990 ms
64 bytes from 8.8.8.8: icmp_seq=1 ttl=117 time=10.046 ms
64 bytes from 8.8.8.8: icmp_seq=2 ttl=117 time=11.432 ms
^C
--- 8.8.8.8 ping statistics ---
Now you can connect to the network using the Wifi module.
If you want to automatically connect to Wifi at startup, add the following to rc.conf.
vim /etc/rc.conf

wpa_supplicant_enable="YES"
wpa_supplicant_flags="-i wlan0 -c /etc/wpa_supplicant.conf"
When connecting by wire
If you want to connect by wire without using Wifi, follow the steps below.
*Personally, it is difficult for me to use vim or sudo, so I installed the necessary packages for wired connection and then configured wireless settings.
# ネットワーク確認
ifconfig

# 有線LAN(alc0)への接続
sudo ifconfig alc0 add 192.168.1.101 netmask 255.255.255.0 up
sudo route add default 192.168.1.1
Once the network is successfully connected, install the package of your choice using pkg install.
For example, to install vim, do the following.
pkg install vim

# 間違えて要らないものをいれてしまった場合
pkg remove vim
pkg autoremove
Sudo settings
Next, we will configure sudo settings.
First, install sudo.
pkg install sudo

# インストール後、visudoで設定
visudo
hoge ALL=(ALL) ALL
*It seems safer to give authority to the wheel group and add the corresponding user, so I’ll also write that down. I would be happy if you could choose the one you like
visudo
# 以下を追加orコメントアウト
%wheel ALL=(ALL) ALL
# ユーザ(hoge)をwheelに追加
pw groupmod wheel -m hoge
Once the settings are complete, log out and log in as a general user, then try using the sudo command.
GUI installation
This time, we will use the ultra-lightweight GUI “twm” that is installed by default on FreeBSD. Create .xinitrc and write the following: *From this point on, you will be working as a general user.
# 最小要件の場合、必要なパッケージをインストール
pkg install xorg twm xterm

vim ~/.xinitrc

xterm &
exec twm
After saving, confirm startup using startx. If the startup is successful, the settings are OK.
startx
Japanese Language Input・Presentation Settings
We will install the following packages for Japanese display. Please enter any font you like.
sudo pkg install ja-font-ipa noto-cjk
fc-cache -fv
Next, install ibus for Japanese input.
sudo pkg install ja-ibus-mozc ibus
Let’s set the environment variables for Japanese input in .xinitrc.
*Please be sure to write it before twm
sudo vim ~/.xinitrc

export GTK_IM_MODULE=ibus
export QT_IM_MODULE=ibus
export XMODIFIERS=@im=ibus
ibus-daemon -drx


xterm &
exec twm
Start the GUI with startx and configure ibus settings.
startx

ibus-setup
On ibus-setup, use ctrl+space to switch, and configure mozc, Japanese keyboard, etc. to arrange it to your liking.
Browser installation
I tried using Midori and other browsers, but changing the settings was a pain and it didn’t suit me.
Personally, I found falkon to be fairly easy to use and didn’t need to change any settings, so I settled on it this time. If you use firefox, it will enter swp, but you can also play videos.
sudo pkg install falkon
falkon
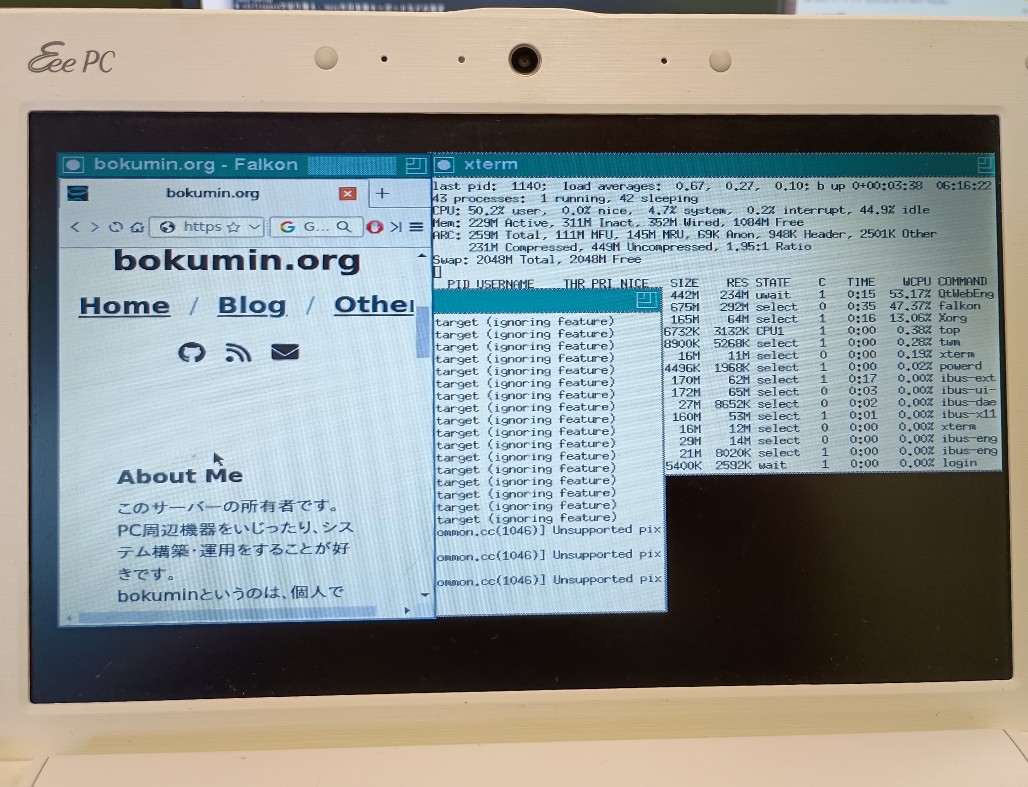
Conclusion
I tried various things to see how well this PC would run, but it worked better than I expected. TWM is too strong, consuming around 3MB of memory. There were no particular problems with DDR2 as long as I didn’t view heavy pages in the browser.
However, it’s difficult to use this as a thin client, but I’m glad to see it working on an old PC like this.
I hope this will be helpful for those who have an old PC and would like to keep it running.
End